|
Fortnite is one of the most popular games and it’s free to play on Nintendo Switch. If users want to download this game, then they can simply download and install over the eShop application. So, if you want to know how, then here are the instructions to download and install it on both Nintendo Switch and Nintendo Switch Lite: Fortnite Download on Nintendo Switch

0 Comments
 Disney Plus launched its streaming services in November 2019. It has offered you a massive collection of movies from Marvel Studios, Star Wars, Disney, National Geographic and Pixar etc. Sometimes subtitles help you to correctly understand the movie for those who don’t understand the default language. So, if you would like to know how to turn on or off the subtitle on Disney Plus. Here are the instructions are given below.
Disney Plus subtitles on Amazon Fire If the users are attempting to turn on or off the Disney Plus subtitles on Amazon Fire, then they should correctly employ the given instructions.
If you would like to turn on or off the Disney Plus subtitle on Roku, then you can determine to pursue the directions given below.
If the users are attempting to turn on or off the Disney Plus subtitle on Android, then they should correctly employ the given instructions.
If you would like to turn on or off the Disney Plus subtitle on LG Smart TV’s, then you can determine to pursue the directions given below.
If the users are attempting to turn on or off the Disney Plus subtitle on PS4, then they should correctly employ the given instructions.
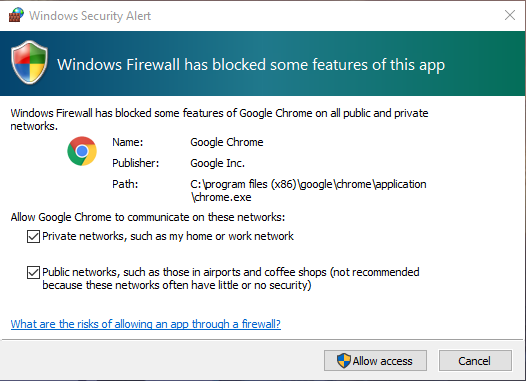
Windows Defender Firewall is one of the best security features which comes in-built in Windows. It is protecting your device’s essential data from viruses and malware etc. When we access various types of website, it protects us from various threats. So, if you would like to know more about Windows Defender Firewall and how to use it on your device, then here are the instructions read them very carefully. Permit an Application via the Firewall
  Apple has made its iPad advanced, and their current lineup iPad is available with lower cost and great features. The only common thing in these iPad is that mostly iPad battle roughly works for 10 hours if you are working on emails, chatting, and browsing. However, sometimes, when you set up your iPad from the previous backup instead of setting up new, you might face the issue of battery draining, which is uncommon and need to be fixed as soon as possible. There are several reasons behind this cause. Because it’s a machine, it will be hard to expect what is causing this trouble, so there are several levels of checking that you can try to be assured of what causes it.
Check by Standby There are several features on iPad that keep the iPad mostly active i.e., AR, ProMotion, and Apple Pencil if you are using. With these features, the processing of the iPad never stops, and that could be the reason for draining the battery. These features stay the screen always on and consume power. You need to know if you are using it twice then before, or it is just happening without your usage. So in this condition, when your iPad has a 30% battery left, you need to keep it as it is. Don’t use your iPad for an hour and check if it is still draining the battery. If your iPad does not drain battery without using it, then the battery is fine, and you can use it because it is just up to your usage. Reset your iPad Restarting or rebooting the iPad is the oldest method of solving several issues, and it works several times. It takes nothing in restarting your iPad device, and you will not lose any of your data while doing it. To restart the device, here is what you need to do.
To reset the device, you can do it manually. In the manual process, you don’t need to press the home button.
It’s true that iOS consumes so much battery, and there are several programs/applications that are behind it. If you utilize the high application range, then it is obvious about battery draining. But if you don’t use it much then, you should check what you are using on your device that consumes much battery. In the settings, you can check what program you are using the most.
Lower the Power and Screen on Timing Unlike the iPhone, in the iPad, low power mode is not available, which is a drawback point, but you can still do it manually.
Most probably, your issues will be solved through these tips, but if still, the problem remains the same, then you should contact Apple support because if there is any hardware issue in your device, they will hear your concern and give a better solution. Source: https://emilyjohnso731.wordpress.com/2020/04/21/how-to-fix-the-battery-life-of-ipad-and-ipad-pro/ Final fantasy 7 is ruling over the heart of both experienced and new players. An abnormal creature of Final fantasy 7 “Jenova Dreamweaver” is a final boss of Shinra Building. Well, it’s true there are numerous monsters available in the game that players will enjoy to kill and keep competitive as well. However, it is one of its kind monster that will only be dead if the player knows the right procedure of defeating it. Square Enix has added various amazing tasks that make the game worth playing. No lack of plot twists and amazing content with great characters are some strong sections. In the final area of Shinra Building players need to rescue Aerith by defeating Jenova Dreamweaver. Jenova Dreamweaver is not a normal boss, and it came from the outer space. Before reaching to the final location of Shinra Building, Jenova hidden in the building and was an experiment subject of Dr. Hojo. The cells of Jenova are places into numerous soldiers, and they now act independently. These soldiers protect Jenova at any cost. So now, here is the guide to defeating this outer space monster strategically. How to Defeat Jenova Dreamweaver in Final Fantasy 7 While the battle with Jenova there will be Tifa, Cloud, Red and Aerith but Barret will not part of this battle because he is out of this mission. Before landing Aerith into this battle, it is essential to upgrade because it can be a vital source of victory. The Ray of Judgement ability will be fairly useful against Jenova’s body. Firstly there will be three locations where players can attack, which is two on the tentacles, and one is the centre body. Try to break the tentacles firs, because Jenova will not be able to tolerate it, and your attacks will deal more damage. To do this, your Ray of Judgement ability will be quite useful in this condition. While doing this, cloud and Tifa should be ready for using their special attack. These attacks will over the first phase of Jenova. In another phase, Jenova will be way more deadly, and its attacks will be more effective. One of its vengeance attacks can kill the player in one shot, so it is better to avoid this attack. In the location pillars available and these are part of the advantage. Best way to be defensive and offensive at the same time is to hide behind the pillars and use the long-range attack against the villain. In this phase, Ray of Judgement ability will support so much, and after doing it, this phase will be over as well. Now focus on destroying every tentacle from use mostly long-range attacks. After doing it, every character will learn something new and helpful. After defeating Jenova in the game, several things will open as rewards and scene will come out. Final fantasy 7 has done a great job to make this remake version of the game because whoever played the original or first edition they know how iconic this part of the game is. However, developers have added several new things that take the game to all new level of entertainment. Final fantasy 7 is recorded as one of the most iconic games of all time and after playing this edition of the game every player understand why this happens. In terms of combat battles, abilities, characters locations, monsters and all more things is a gem for it. Source: https://emilyjohnso731.wordpress.com/2020/04/21/final-fantasy-7-how-to-defeat-jenova-dreamweaver/  To progress the game and to defeat the deadly enemies in the higher level, it is essential to increase the stats of the hero. Doom Eternal builds several improved powerful monsters and mechanics that make attaching the game with entertainment and toughness. The gameplay and soundtrack of the game deliver the ultimate room for players to keep in the game totally with full focus. The brutal fights, the satisfaction of killing enemies, and the experience of surrounded by chaos are what Doom Eternal has provided to gamers in the best and smoothest FPS game. This series of games is not unique because of its title but also unique from its FPS experience and set up. FPS games are getting bigger over and over, but Doom Eternal took all the unseen and unique variety into one game with real-life experience. To tear every enemy apart in Doom Eternal players have to level up their stats, and it’s a must-do thing. The hero is already packed with some deadly gears and weapons to defeat the slayer of the demon, but upgrading gives some additional support to the player. In terms of weapons, gears, armor, and these are useful, and their up-gradation keeps death scenario far from the player. In order to upgrade the stats, the most important thing players need is Hero points and upgrade. The availability of these points enhances the skills and abilities that will help the players to be stronger. Now to improve the hero, here is the guideline that can be followed throughout the game. How to Enhance the Stats of Hero in Doom Eternal Leveling up can enhance the ability and endurance of players quickly. There are several types of secrets that players have through search. In most of the secrets, a variety of players will obtain several items, but most of the time, they will find Sentinel Crystal. This Sentinel crystal is an essential item that can easily increase the stats, whether they are about health, ammo capacity, or shield capacity. When the player gets the crystal, they just have to use it on the specific stat by holding on to the option. Each slot that player upgrade will be effective in a particular niche. Every slot will improve the strength of the hero to make it even better. Hero up-gradation will take time because from improving below to a higher level, it cannot happen easily. With every level and progression, players will realize how much they have improved. There is no restriction on whether players can choose any slot among multiple. It makes several things better. If anyone prefers attacking, then they should improve stat of offensive, and if anyone prefers defending, then they can level up the defense slots. Collect the Sentinel Crystal as much as possible to make your hero more possessive and effective against demons. Source: https://howmcafee.com/doom-eternal-how-to-enhance-the-statistics-of-hero/  Windows provides a feature to refresh all the systems from the initial stage that is restarting process Windows. After upgrading to a new edition of OS, sometimes we face several issues such as rebooting Error or application crashing issues. If you are one of them who are facing the error “Windows 10 Won’t Boot” or “Windows 10 not Restarting,” then you have to undergo with some of the necessary workarounds. Windows 10 is the latest edition of Microsoft Operating System which equipped with latest features and smart stuff. Windows 10 provides various upgraded features to its customers to facilitate Error-free technical environment, but some time windows fail to restart. In this case, you should be very aware of every change on your device to fix the issue. Troubleshooting Issue by Booting under Safe Mode
Getting out of the Safe Mode
Using System Restore Feature
 Excel Macros can save your headaches and time by repetitive tasks, automating common, and you also don’t need to program VBA (Visual Basic Application) for it. With Excel, you can record your keystrokes and in this article, we will show you five Tips for creating Excel macros. Five Pro Tips for Creating Excel Macros Here are the five tips that you need to run into your device to create Macros:
Keep names of macro small and short but descriptive, and when you re-record several macros, then you can quickly examine the micro when you have especially kept the short name. The “System” can also allow a field for properties that cannot be used by everyone. Make sure macro names being with an alphabet and does not contain any space, punctuation mark, and symbols after First alphabets. You can also more alphabets, number, an underscore character, or here maximum length in 80 letters. 2) Using Relative (Absolute) Cell Address Absolute mean the approximate cell area is recorder in the macro or hardcoded and cell address like A6 or A 13. Absolute provides a limit to the macro capability to function when any change appears in the cell, such as new data removed or added, or when the list get lengthy. Relative means macro recorded relative keystrokes to find the cell location. Here is the step on how to change relatives and stop recording:
Always start at home position with your cursor or data in cell A1. If you wish to save your macro into a personal workbook, then you be able to reuse that macro on a similar worksheet. Although you need to keep your cursor positioned being with cell A1 and recording a macro, or if you have located in cell A1 already, then your first macro must be in Ctrl+Home to confidence to launch the Home. 4) Navigate with Directional Button You can use directional keys to navigate your cursor to add delete or change data into the sheets you needed. When you have alternative spellings in the cell address, then changes and edit invalidate your function on sheet. For example: if your code as Sum A1 via A21, then you need to add more rows such as A1 to A35 here the formula not attached in the additional cell, and the total sum will go wrong. Here you need to use the mouse and navigate your cursor is much complicated and nit easy. When the macro appears, use your mouse to choosing or tapping on the menu option. 5) Keep Marcos Specific and Small Keep your macro particular, and little to do your task, the bigger size of a macro run slower, primarily it is run slower, when you need to perform several functions, lots of formula and calculate in a big spreadsheet. It can combined tasks into macro or fail. To forever located in the cell to the point of failure. When you get every macro separately, then you need to review results and then verify accuracy quickly. Emily Johnson is a creative person who has been writing blogs and articles about cybersecurity. She writes about the latest updates regarding office.com/setup and how it can improve the work experience of users. Her articles have been published in many popular e-magazines, blogs, and websites. Source: https://legitoffice.com/blog/five-pro-tips-for-creating-excel-macros/  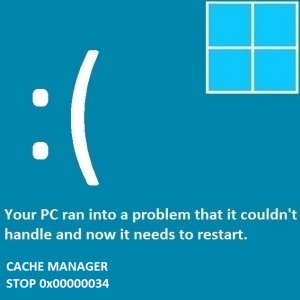 Blue screen of death errors might be problematic while you restart your computer several times. When the error BSOD can be caused issue on your operating system, then you will surely want to fix this issue. So in this article, we will show how you can fix “CACHE MANAGER ERROR BSOD” in Windows 10 operating system.
How to Fix Error CACHE MANAGER BSOD in Windows 10 In this article we will show you how you can fix error “CACHE MANAGER BSOD” In Windows 10” with six troubleshoot in simple steps;
We know that Microsoft is always working on releasing new features and improving issues in Windows 10 via their regular updates of windows 10. In every new update, they attach new features or solutions of bugs fix. Every new update can able to fix many bugs or issues from your windows 10 operating system. Still error “CACHE MANAGER BSOD” can occur on your device due to incompatible hardware. So it is a good idea to always keep the Windows 10 up-to-date with the latest updates. By downloading and installing Windows 10 regularly, updates can minimize the issue of any error on your operating system, so we recommend you update your Windows 10. 2) Performing BSOD Troubleshooter Here are the steps on how to perform BSOD Troubleshooter:
Here are the steps on how to perform SFC Scan:
Here are the steps on how to perform DISM:
Here are the steps on how to perform Windows Installation Media:
Here are the steps on how to perform Chkdsk:
Here are the steps on how to perform the Chkdsk scan:
Source: https://ukmsoffice.com/blog/fixed-cache-manager-error-bsod-in-windows-10/  Shooting videos and photos from the mobile device can be blurry and unclear when it does not take from the right way. That is why stability while shooting is necessary that can enhance the quality of the picture and can make your photography skills better. In the current time, most people shoot with the mobile device, and that is why knowing about mobile stability is more important than any other photography device. While shooting the video, there are several factors that you need to know to take the best photos and videos.
Ways o Perfectly Shoot Photos and Videos From Proper Handling on Phone One of the most common mistakes people usually do is not grab the mobile device properly at the time of the shooting. The grip is important while taking the photo because if the grip is loose, your mobile device can damage though falling and can be blurred if hands shake. The basic and the best way you can try is to take a picture with two hands to keep the device stable. With two hands, the chances of stability are higher, and you can easily click the image or shoot video through this. Even if you take the picture in landscape mode, just try to focus that your thumb is reaching to the shutter button easily. If you face any kind of trouble in clicking on the shutter button, then your image might get some problems. You can also take the picture from the volume button if you are taking the picture from an uncommon angle. In the night time of low light photo photography, you can try through putting the elbow on the torso to stay put while shooting. It keeps the device stable whenever you take the picture, and also, the light does not affect the picture. This basic thing can easily help you to take a picture of shoot video through perfect stability without any additional device. Use Surface for Perfect Stability while Shooting Tools and the common flat surface can be so much helpful in your photography. Table, railing, chair, or any other surface that you can use to put the device into a stable position can be helpful to keep the device stable on position. These are the primary surfaces that can easily provide you help as you want and do not require many changes. Whenever you try to shoot the night scene with pro manual mode, just do the shutter speed lower because the phone needs to be steady as much as possible. In the automatic mode, shutter speed is already lower, and that is why you need to be steady in that situation. You can also put a timer and focus through tap and then press the shutter to start the timer. This process is also a beneficial process of taking a great picture. You can lock on the focus by holding on the display, but in some devices, some features are different. This method can help a lot while shooting the video because at the time of shooting video, if the subject move, the focus will remain the same, and it will not blur the video even if the subject is moving. It can be set on any angle; all you need to just lock the focus and start shooting by pressing the shutter button or by using the timer. Use the Mounts, Tripods, and Gimbals In the industry of photography, tripods are an essential part, and their value doesn’t need any explanation. Tripods come in several shapes, sizes, and features, and the only thing they have common is they keep the device stable in the best way for any angle. Because they can extend themselves to a bigger size and any angle, people prefer to use these for basic and professional use. The flexible legs of tripods can adjust to any area or any object like the poles, branches, railings, and many more things. They are the perfect device to shoot photos and videos from any angle and height. It also depends on the photographer about what or how they use it. Here are some tips that you need to know when using a tripod:
Understand the Lines and Their Between In the mobile camera grid photos option default available, but in some devices, users have to activate it. With this feature, you will line on display, and these grid lines help you to find the level of the picture when you are shooting through the straight side. These guidelines are perfect to know how many sides you need to take and on what angle. With this, the framing of image or video will be perfect, and with the stability you already following the right way. Source: https://emilyjohnso731.wordpress.com/2020/04/20/how-to-perfectly-stabilize-mobile-device-while-shooting-videos-and-photos/ |
